Certificate Authority with EasyRSA
There many options to setup your own Certificate Authority (CA), like using Microsoft Certificate Authority, EJBCA, or AWS Private CA. They all take either plenty of time to setup, or plenty of money. If you want to setup your own PKI that you would rarely update, or it is for testing purposes only, I recommend to have a look at EasyRSA. The documentation for EasyRSA also has a nice introduction to Public Key Infrastructure (PKI), so you do not get too lost of what this is about.
The Plan
In this page we will walk through the setup of:
- a root CA.
- an intermediate CA.
- a client certificate, which you can use to identify an entity to a service (we will use this certificate for AWS IAM Roles Anywhere in another post).
- a server certificate, which you can use to server as TLS certificate for running HTTPS server.
Requirements
The requirements for this
- A recent GNU/Linux OS with OpenSSL installed.
- Some knowledge about GNU/Linux CLI, including editing files in Linux (using vi or nano).
- EasyRSA from https://github.com/OpenVPN/easy-rsa. At the time of writing the latest release is 3.1.5. We will use the tgz archive from that release.
Main Steps
The main steps are:
- Initialise Root CA with self-signed certificate.
- Initialise Intermediate CA with certificate signing request (CSR) to be signed by Root CA.
- Generate a CSR for the client entity and a web server, to be signed by Intermediate CA.
The detailed steps are:
Initialise Root CA
-
Download EasyRSA to a working directory. Use curl or wget, e.g.:
mkdir ~/CA cd ~/CA wget https://github.com/OpenVPN/easy-rsa/releases/download/v3.1.7/EasyRSA-3.1.7.tgz -
Extract the tgz and copy the extracted directory as Root CA directory.
tar xzf EasyRSA-3.1.7.tgz cp -ar EasyRSA-3.1.7 DemoRootCA -
Initialise the Root CA. This will create `pki` subdirectory and populate sub directories under `pki` and create `vars` file.
cd DemoRootCA # initialise PKI ./easyrsa init-pki -
Copy vars.example to pki/vars:
cp vars.example pki/vars -
Edit `pki/vars` file, find the line that has `EASYRSA_DN` and to allow adding more information to the Distinguished Name (DN) instead of only Common Name (CN), make it look like this:
set_var EASYRSA_DN org -
Generate the private key and the self signed certificate with 7305 days (about 20 years) validity period. Follow the prompt, make sure you fill the Common Name with something the informs it is Root CA, and save the pass-phrase for the private key somewhere in your secure system, preferably a password manager. Here is a sample output:
$ ./easyrsa --days=7305 build-ca Using Easy-RSA 'vars' configuration: * /home/haris/CA/DemoRootCA/pki/vars Using SSL: * openssl OpenSSL 3.0.2 15 Mar 2022 (Library: OpenSSL 3.0.2 15 Mar 2022) Enter New CA Key Passphrase: Confirm New CA Key Passphrase: ..+.....+.+......+...........+++++++++++++++++++++++++++++++++++++++++++++++++++++++++++++++++*.............+....+...+++++++++++++++++++++++++++++++++++++++++++++++++++++++++++++++++*....+.......+...+....................+......+++++++++++++++++++++++++++++++++++++++++++++++++++++++++++++++++ .+...+...+...........+.+..+.......+...+......+..+...+.+......+...+...........+...+.......+.....+...+++++++++++++++++++++++++++++++++++++++++++++++++++++++++++++++++*......+.........+......+.......+..+...+.+..+++++++++++++++++++++++++++++++++++++++++++++++++++++++++++++++++*.............+..+.......+.....+......+.........+.+......+......+........+......+.+.....+...+....+..+...............+.............+..+....+......+......+...+......+........+.......+........+.......+......+........+.+.....+.+............+........+....+...+........+...+.+...............+...+..+...................+.....+.+...+..+.+..+++++++++++++++++++++++++++++++++++++++++++++++++++++++++++++++++ ----- You are about to be asked to enter information that will be incorporated into your certificate request. What you are about to enter is what is called a Distinguished Name or a DN. There are quite a few fields but you can leave some blank For some fields there will be a default value, If you enter '.', the field will be left blank. ----- Country Name (2 letter code) [US]:AU State or Province Name (full name) [California]:QLD Locality Name (eg, city) [San Francisco]:Brisbane Organization Name (eg, company) [Copyleft Certificate Co]:Demo Root CA Organizational Unit Name (eg, section) [My Organizational Unit]:Public Key Infrastructure OU Common Name (eg: your user, host, or server name) [Easy-RSA CA]:DemoRoot CA 01 Email Address [me@example.net]:root-ca-01@sample.net Serial-number (eg, device serial-number) []: Notice ------ CA creation complete. Your new CA certificate is at: * /home/haris/CA/DemoRootCA/pki/ca.crt -
Inspect the generated certificate file in pki/ca.crt. The Issuer and Subject should be exactly the same, as it is self-signed certificate, and the Not After validity should be about 20 years in the future.
openssl x509 -in pki/ca.crt -text -noout -
Save the Root CA certificate for later use, the file should be `pki/ca.crt`.
Initialise Intermediate CA
-
Copy the extracted EasyRSA to Intermediate CA directory.
cd ~/CA cp -ar EasyRSA-3.1.7 DemoIntermediateCA -
Initialise the Intermediate CA. This will create `pki` subdirectory and populate sub directories under `pki` and create `vars` file.
cd DemoIntermediateCA # initialise PKI ./easyrsa init-pki -
Copy `vars.example` to `pki/vars`:
cp vars.example pki/vars -
Edit pki/vars file, find the line that has `EASYRSA_DN` and to allow adding more information to the Distinguished Name (DN) instead of only Common Name (CN), make it look like this:
set_var EASYRSA_DN "org" -
Generate the private key and certificate signing request as subca. Follow the prompt, make sure you fill the Common Name with something that informs it is Intermediate CA, and save the pass-phrase for the private key somewhere in your secure system, preferably a password manager. Here is a sample output:
$ ./easyrsa build-ca subca Using Easy-RSA 'vars' configuration: * /home/haris/CA/DemoIntermediateCA/pki/vars Using SSL: * openssl OpenSSL 3.0.2 15 Mar 2022 (Library: OpenSSL 3.0.2 15 Mar 2022) Enter New CA Key Passphrase: Confirm New CA Key Passphrase: .+.........+......+............+.....+..........+..+......+....+........+++++++++++++++++++++++++++++++++++++++++++++++++++++++++++++++++*.+...+...+..+....+++++++++++++++++++++++++++++++++++++++++++++++++++++++++++++++++*.................+.+...+++++++++++++++++++++++++++++++++++++++++++++++++++++++++++++++++ ..+...+.........+...........+++++++++++++++++++++++++++++++++++++++++++++++++++++++++++++++++*.+..+.+.........+...+.........+...+......+..+..........+..+.+..+.........+......+...+.+...+.....+.+.....+.+........+......+......+.+.....+.........+...+............+.+........+.......+.........+.....+++++++++++++++++++++++++++++++++++++++++++++++++++++++++++++++++*..............+.........+...+..+....+.....+.+........+.+..+..........+..+.+...........+..........+...+..+......+.........+.........+....+........+....+.....+.........+.+...........+...+....+...........+.......+...+............+........+......+...................+.........+........+...+.........+...+.......+...+.................+...+..........+..+......+.+...+...+...+.........+...............+..+................+...+............+..+.+++++++++++++++++++++++++++++++++++++++++++++++++++++++++++++++++ ----- You are about to be asked to enter information that will be incorporated into your certificate request. What you are about to enter is what is called a Distinguished Name or a DN. There are quite a few fields but you can leave some blank For some fields there will be a default value, If you enter '.', the field will be left blank. ----- Country Name (2 letter code) [US]:AU State or Province Name (full name) [California]:QLD Locality Name (eg, city) [San Francisco]:Brisbane Organization Name (eg, company) [Copyleft Certificate Co]:Demo Intermediate CA Organizational Unit Name (eg, section) [My Organizational Unit]:Public Key Infrastructure OU Common Name (eg: your user, host, or server name) [Easy-RSA Sub-CA]:DemoIntermediate CA 01 Email Address [me@example.net]:demo-intermediate-ca-01@sample.net Serial-number (eg, device serial-number) []: Notice ------ Your intermediate CA request is at: * /home/haris/CA/DemoIntermediateCA/pki/reqs/ca.req and now must be sent to your parent CA for signing. Place your resulting cert at: * /home/haris/CA/DemoIntermediateCA/pki/ca.crt prior to signing operations. -
Grab the location of the CSR and the expected location of the signed certificate for later.
-
Go to Root CA directory and import the Intermediate CA CSR. Pick a label for that certificate, e.g. intermediate-ca-1.
cd ~/CA/DemoRootCA ./easyrsa import-req ~/CA/DemoIntermediateCA/pki/reqs/ca.req intermediate-ca-1 -
That CSR from Intermediate CA is now ready to be signed by Root CA. Sign it with 10 years validity. Enter the pass-phrase for the Root CA private key when prompted. Grab the location of signed certificate.
./easyrsa --days=3650 sign-req ca intermediate-ca-1 -
Copy the signed certificate and place it to the expected location as printed in step 5, which should be ~/CA/DemoIntermediateCA/pki/ca.crt.
cd ~/CA/DemoIntermediateCA cp ~/CA/DemoRootCA/pki/issued/intermediate-ca-1.crt ~/CA/DemoIntermediateCA/pki/ca.crt -
Inspect the signed Intermediate CA certificate. It should show the subject common name as the intermediate CA DN and the issuer as the root CA DN, with Not Before validity as 10 years in the future
cd ~/CA/DemoIntermediateCA openssl x509 -in pki/ca.crt -text -noout -
Save the Intermediate CA certificate for future use (the one that you just copied from the Root CA directory. The file should be pki/ca.crt.
Generate Client/Server CSR to be signed by Intermediate CA
-
In order to have Subject Alternative Name in the certificate information, we need to create a config file. Create a file with the name csr-san.conf under /tmp directory and the following content (this will allow you to create a certificate with a SAN entry as host.example.org):
[ req ] default_bits = 2048 distinguished_name = req_distinguished_name req_extensions = req_ext [ req_distinguished_name ] countryName = Country Name (2 letter code) stateOrProvinceName = State or Province Name (full name) localityName = Locality Name (eg, city) organizationName = Organization Name (eg, company) commonName = Common Name (e.g. server FQDN or YOUR name) [ req_ext ] subjectAltName = @alt_names [alt_names] DNS.1 = host.example.org -
Create CSR. Run the following command and follow the prompt.
cd /tmp openssl req -out host.example.org.csr \ -newkey rsa:2048 \ -nodes \ -keyout host.example.org.key \ -config csr-san.conf -
Inspect the CSR if necessary.
openssl req -in host.example.org.csr -text -noout -
The CSR file is `host.example.org.csr`. Import it to the Intermediate CA database two times, one as client certificate, another as server certificate.
cd ~/CA/DemoIntermediateCA ./easyrsa import-req ~/tmp/ubuntu20lts-01.csr client-host.example.org ./easyrsa import-req ~/tmp/ubuntu20lts-01.csr server-host.example.org -
Sign the CSR, one as client, and another as server, with two years validity. Run the following, follow the prompt, and take notes about the location of the signed certificates.
./easyrsa --days=730 sign-req client client-host.example.org ./easyrsa --days=730 sign-req server server-host.example.org -
Save the certificate files to /tmp and inspect them. Find the differences.
openssl x509 -in-text -noout -
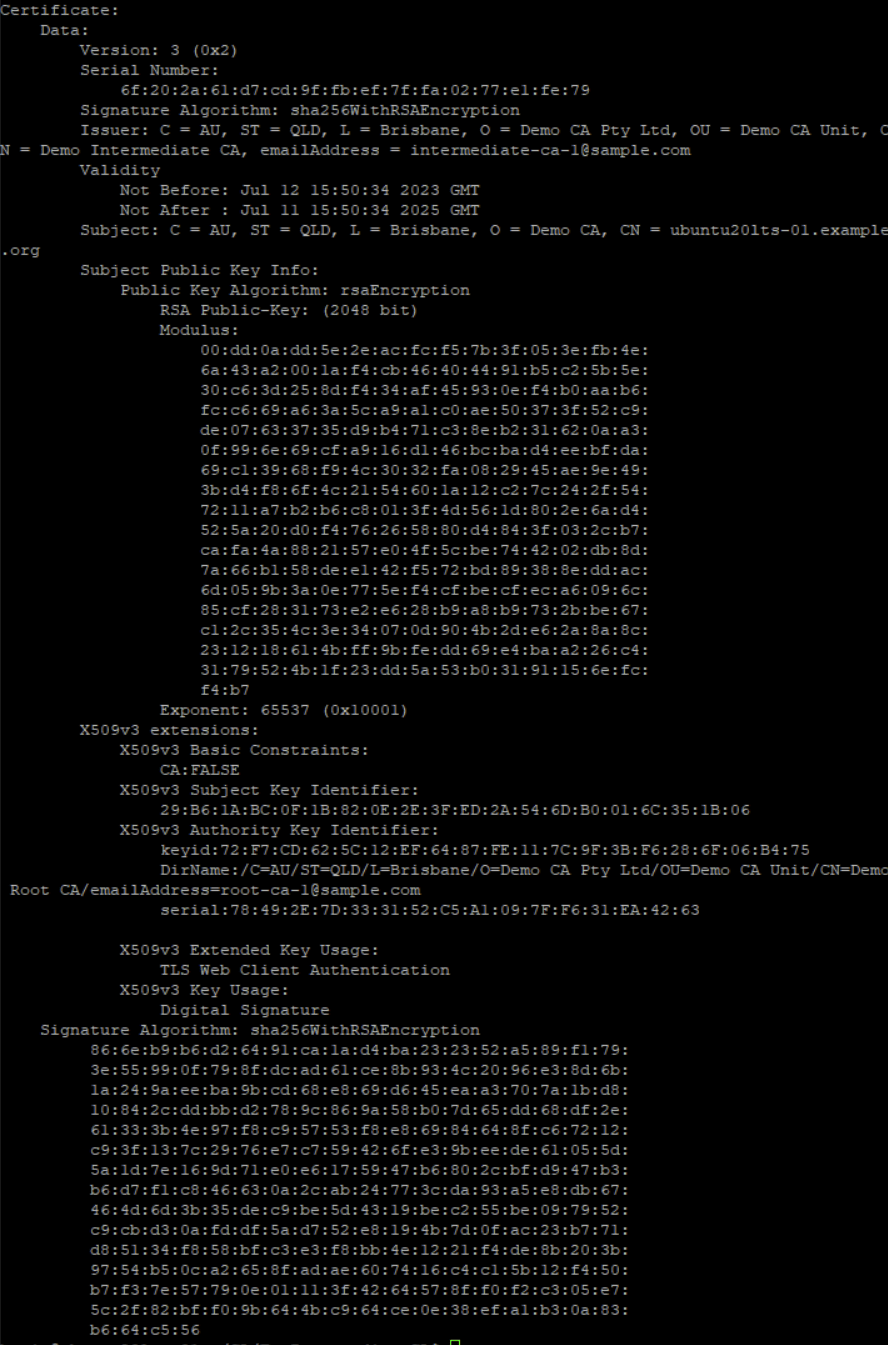
You can now use the key pair (the private key and the certificate file which has the public key) as certificate for authentication (the client certificate) or as TLS server (the server certificate). Make sure you also present the Intermediate CA certificate. The Root CA must be trusted by the other party that you want to connect to, or want to connect to your server.
Here is an example of a client certificate that was signed by a private CA which was managed by EasyRSA: