If you are thinking about getting a router/firewall that can do a lot more than just allow 10 computers to access the Internet but don't want to spend too much on licence, I recommend pfSense for the software and any pfSense compatible hardware with low power. If your setup is simple, such as filtering one network (your LAN) to the Internet you can use two ethernet ports low power hardware such as Netgate SG-1000. I personally use PC-Engines APU1D, one with three ethernet ports because I need to separate my lab network with the network for my family.
In this tutorial I will show you the process of installing pfSense Community Edition version 2.3.2 on a hardware with three ethernet ports. The actual installation was performed on a virtual machine on VMware ESXi, although the same setup procedure can be applied to any hardware with three ethernet ports. You should be able to find similar tutorial, but I want to show you later on how to configure pfSense to filter incoming and outgoing connection, including transparent proxy with SSL and other features which are really cool, even better than Cisco ASA 55*5.
The installation process is pretty straightforward. After you prepare your hardware and manage to boot to pfSense installation media, whether CD or flash disk, you will start with this screen.
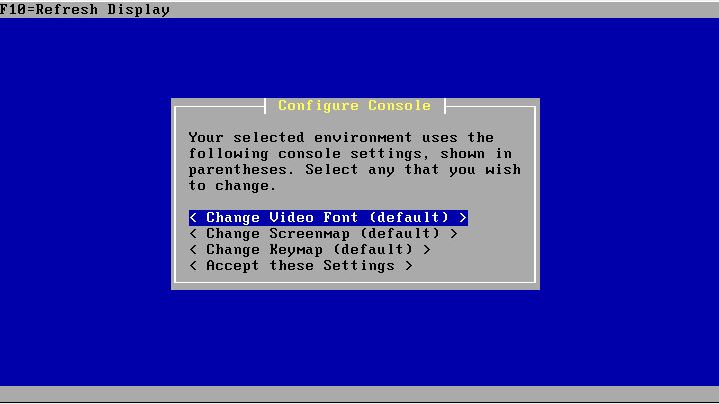 Just accept the default values unless you really know what you are doing. Press down arrow three times to navigate to < Accept these Settings > then press Space bar to move to next screen.
 Again, select default selection unless you know what you are doing. On < Quick/Easy Install > press Space bar to proceed to next screen.
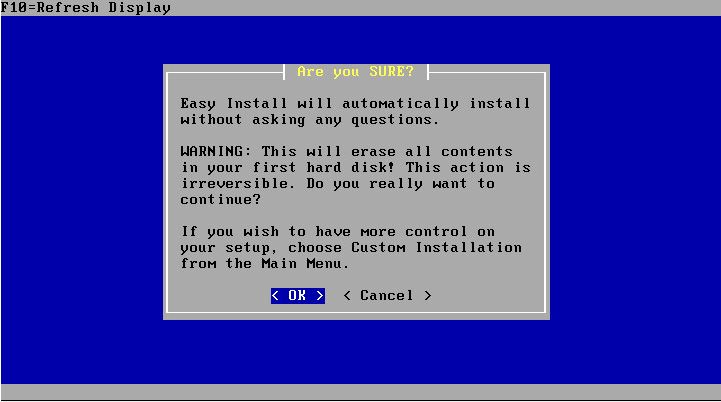 Read the warning, the press the Space bar on < OK > to proceed.
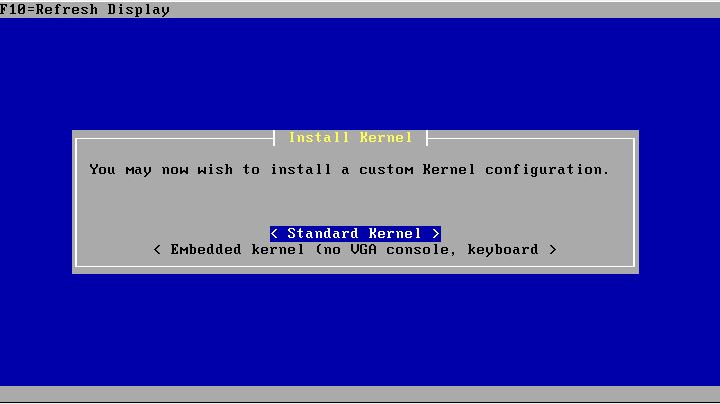 On a computer than can be connected to a monitor, select < Standard Kernel >. For headless systems like Netgate SG-1000 or PC-Engines APU, select < Embedded kernel (no VGA Console, keyboard >. Press Enter.
 You should be able to see the progress of pfSense installation on the hardware. Wait until it prompts for a restart.
 Once the installation is completed, it will prompt you to reboot. Hit Space bar on < Reboot > to restart the computer.
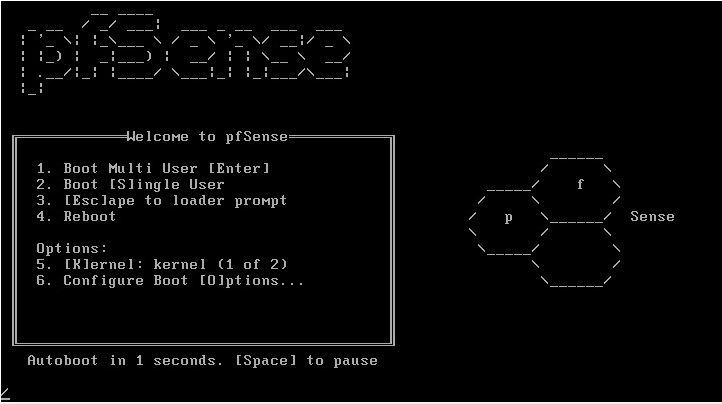 When it restarts you should see this screen. You can press Enter or leave it as is and it will select Boot Multi User anyway. Wait until the boot process is finished.
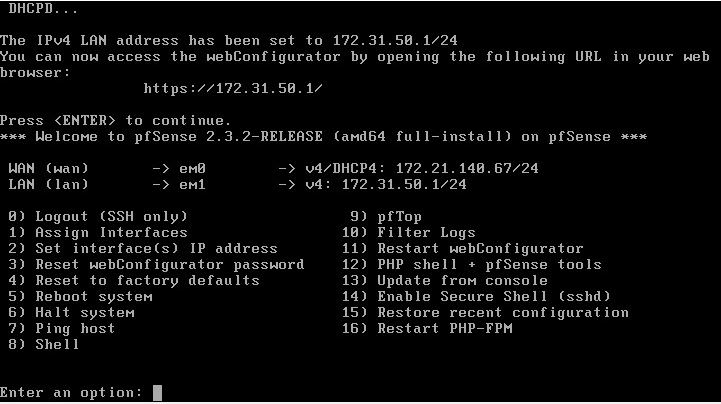
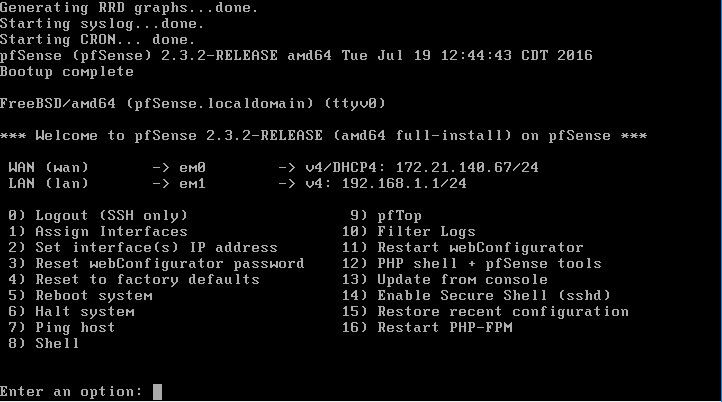 When you see this screen, basically your pfSense is ready with the following configuration:
- Your LAN interface (the one for your local network) is using static configuration with IPv4 and the address is 192.168.1.1. If you connect a computer directly to the LAN port (it is usually the middle one on a three ethernet ports headless system) your computer will have an IP address assigned within 192.168.1.0/24 subnet to allow you configure the pfSense via web browser at https://192.168.1.1/
- Your WAN interface (this is the one that should face the Internet or other external network) by default uses DHCP. If you are using PPPoE, such as bridging your ADSL connection through an ADSL modem then you should enter the PPPoE credentials in the web configuration.
- Your outgoing connection from LAN to outside network is translated via the WAN interface using WAN. You don't need to manually configure the NAT (unlike Cisco IOS), it is enabled by default.
- All outgoing connection from LAN to the outside world is allowed by default, whilst all incoming connection from outside world via/to the WAN interface is blocked. Especially from bogus network and RFC1918 (private) IP addresses.
Personally I don't like to have 192.168.1.0/24 as network for LAN. There are instances where I had to connect my LAN or my PC in my LAN to other network via VPN, and problem arises if the network also uses 192.168.1.0/24. Although there are workaround to solve that problem but life would be much easier if we setup the network to something more uncommon than anything with 192.168.1.0/24. So let's change the network for the LAN. Press 2 to start changing the IP addres for LAN interface.
 Enter 2 to select LAN interface.
 RFC1918 defines that you can use the several block of IP address subnets for your own use in your LAN. They are
- 10.0.0.8
- 172.16.0.0/12
- 192.168.0.0/16
With the least commonly used block is 172.16.0.0/12. This block means that you can select IP address range between 172.16.0.0 to 172.31.255.255. Each number between the dots can be anything between 0 to 255, but the RFC1918 limit the firs two numbers to be 172 for the first number, the second number must be anything between 16 to 31 inclusive, the third number can be anything between 0 to 255 inclusive, and the last number can be anything between 0 to 255.
For this tutorial I will select 172.31.50.0.24 as the subnet and will assign 172.31.50.1 as the IP address of my LAN interface. So on the prompt to enter new LAN IPv4 address I enter 172.31.50.1, then Enter. The subnet mask is 255.255.255.0, which is 24 bits. Enter 24 for the new LAN IPv4 subnet bit count and press Enter. For a LAN it doesn't need gateway so press Enter of the upstream gateway selection for LAN.
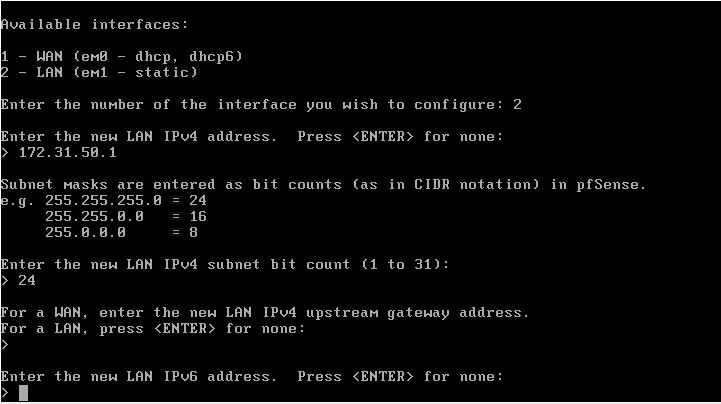 We don't want to configure IPv6 at this stage. Press Enter.
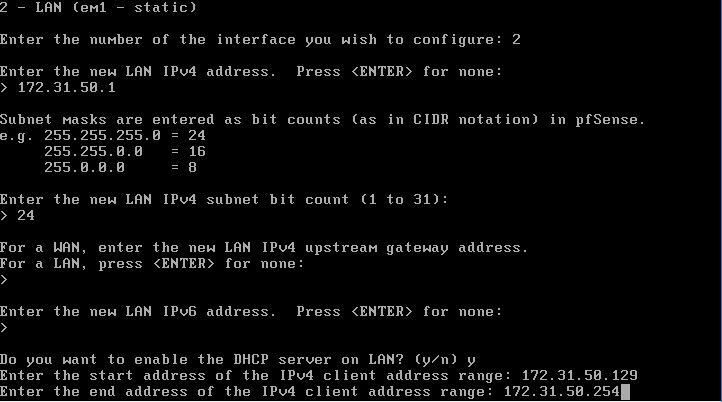 We need to enable DHCP to avoid configuring the network address for each PC, unless you have another server that already runs DHCP. To enable DHCP press y on the prompt to enable DHCP. Then pick any number between 2 to 254 for the start of IP address assignment, and pick any number greater than the start number but less than 255 (because 255 will be used for broadcast address). In this case I select 172.31.50.129 as the start of the range and 172.31.50.254 as the end. This means that the first computer that requests IP address assignment will get 172.31.50.129, the next one will get 172.31.50.130, and so on until DHCP runs out of IP address to distribute.
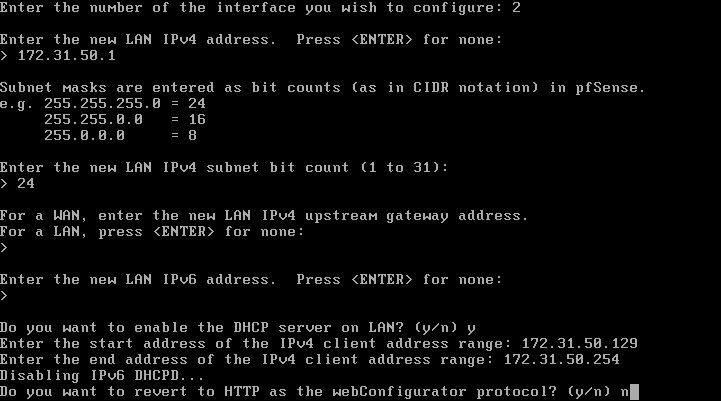 Final question, we want to have secure connection between the browser and the pfSense using HTTPS, so we don't want to revert to HTTP. Press n on the next prompt to prevent it going back to HTTP.
 That's it! Your pfSense is now ready to act as a router although it still has the default username and password (username admin and password pfSense). If you connect a computer to the router or via switch, the computer will get an IP address assigned from the pool 172.31.50.129-172.31.50.254. As long as the pfSense is connected to the Internet via WAN, then the computer in the LAN network should be able to access the Internet via the pfSense.
Go on! Connect your computer to the LAN network of the pfSense and ping 172.31.50.1. We will cover the initial web configuration on a separate tutorial.